Once the permit is secured your contractor will prepare the site. They will remove the topsoil and compact the ground to ensure a strong foundation.
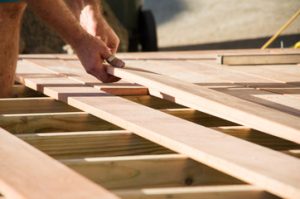
Dry-fit floorboards on the deck frame to determine how many will fit before nailing them in place. Leave a gap between boards for expansion and contraction. For professional help, contact J&R Construction.
Before starting a deck building project, you should choose your materials. Different material options directly impact upkeep, cost and appearance. In addition, each type of wood offers different durability factors for your local climate.
Natural wood is a popular choice for deck building due to its affordability and availability. Pine planks, for example, are often treated with an alkaline copper solution that resists rot and pests. However, this treatment only lasts about 10 years before it needs to be reapplied. Other options include pressure-treated pine (PTP), which is cheap and easy to work with, or slow-growth hardwoods like ipe, tigerwood, mahogany and teak, that have dense fibers but come at a heftier price tag.
Composite boards, on the other hand, feature a mix of wood fibers and recycled plastics. The result is a long-lasting and eco-friendly option that reduces the need for frequent staining and sealing.
Other choices for your deck build include the types of fasteners and hardware you will use. Choosing durable products will also save you money in the long run by reducing your maintenance costs and repairs. Some composite materials also have manufacturer’s warranties and guarantees, which can further increase their value.
Your foundation will also have a major effect on the long-term stability of your deck. Most code guidelines call for a concrete pier foundation, but some homeowners opt for on-grade cement blocks. While this satisfies most codes, it is not as strong as a properly constructed poured pier.
Before starting a deck build, you should make sure that your construction plans are up to code and that you have the proper permits and a certificate of occupancy. It is also important to budget for unexpected expenses such as soil testing, delivery fees, tool rental and waste removal. Lastly, it is wise to set aside 10%-20% of your total project cost for miscellaneous costs. With the right preparation and planning, you will have a beautiful new deck in no time! Contact Deer Ridge Construction today to get started. We’ll be happy to help you every step of the way.
Designing Your Deck
Like a house, decks must be designed to accommodate the way you’ll use them. Identifying the purpose of your deck — as a hub for social gatherings, a retreat for relaxation, or both — can help you make design choices that will serve your family’s lifestyle and aesthetic goals.
The size and layout of your deck will also play a role in its function and utility. Taking accurate measurements of your yard or outdoor area, including any existing structures, can help you determine the best location and size for your deck. You may want to consider adding a hot tub or pool to your deck as well, but keep in mind that these additions require additional planning and structural considerations.
Your deck’s foundation will depend on your soil and climate (for example, northern climates usually require deeper footers to reach the frost line). In addition, you’ll need to decide if you’ll build your deck on ground level or raise it up using a freestanding structure like a platform or stairs. Once you’ve determined your deck’s substructure, you can use a plan drawing to complete a material takeoff to determine the quantity of materials required for the project. Referring to TimberTech installation guides can also help you ensure that you have all of the tools necessary to complete your deck building project.
A key part of the deck design process is navigating local building requirements and regulations. For example, your municipality might have specific rules regarding setbacks and the distance your deck can be from the house. Also, fire regulations might require your deck to be made from flame-retardant materials. Understanding these regulations will help you design a deck that will comply with the law and prevent costly fines down the road.
Most importantly, your deck needs to be safe for people to walk on and enjoy. That’s why pulling a building permit is an important step in the design process. Building a deck without a permit is illegal and can lead to fines for both the builder and homeowner.
Building Your Deck
Whether you’re building a small ground-level deck or an expansive elevated structure, it’s important to follow all local building codes and permits. This ensures that your deck meets minimum safety standards and provides a safe environment for relaxing or entertaining.
First, remove grass and other plants in the area where you want your deck to be located. Using string lines and stakes, outline the shape of your deck and mark footing locations. If your deck is attached to the house, install waterproof flashing at each attachment point. Then, build the ledger board. This board connects the deck to your home and will be the foundation of your entire structure. It is very important that this board be correctly positioned, level, and fastened with lag screws.
Once your ledger board is in place, you can begin digging concrete footings. In cold climates, it’s normal to dig the footings about four or five feet below ground level, which prevents frost heaving over time. It’s also a good idea to use a vibrator when pouring the concrete, as this will help reduce air bubbles and create a stronger and more even foundation.
Posts and beams are next to be installed. For freestanding decks, these will support the frame, while for connected and supported decks, they provide vertical support. The joists that will hold the deck boards are then placed on top of the posts and beams. For maximum strength, joists should be spaced 16″ on center.
For a more finished look, you can screw down the joists with hidden fasteners. For a rougher finish, you can use nails, although this will require regular maintenance to keep them in good condition.
Once the joists are in place, it’s time to install the decking. Decking should be nailed down at each joist with decking screws, which are specially designed for the material you’re using. It’s a good idea to have a second set of hands for this step, as it can be very difficult to nail down a board and keep it straight while driving in the decking screws. When the decking is in, leave a small gap between each board to allow for expansion and contraction.
Finishing Your Deck
While wood is a beautiful material to work with, it can’t hold up to the elements without proper protection and care. Whether it’s stain or paint, protecting your deck can help it last longer and keep it looking great. Stain is the most common material used for this, but there are many different varieties to choose from. Choose the best one for your budget, style and climate.
A good way to protect your deck is with a stain or coating that will seal the wood and protect it from moisture, sun and other weather elements. It’s also important to follow all the instructions on the label to ensure the best results. Be sure to let it dry completely before walking on your deck or putting down furniture. If you’re unsure about the process, consult with a professional to get the job done right.
The best way to make a deck stand out is with railings. They come in a variety of colours and styles, so there’s sure to be something to match every home. For a modern look, try switching out the traditional wooden balusters for sleek metal ones. They’re easy to install, too – just screw them in!
You can also upgrade the look of your deck by adding lights. The lighting helps to set the mood, and can really make your deck pop. Make sure to use a waterproof fixture, and to install it away from the power source to avoid any electrical problems.
When building your deck, it’s important to pay attention to the footings and beams. A well-built foundation can prevent water damage and prolong the life of your deck. To build a solid foundation, pour concrete in a hole that is 6 feet deep and wide enough to fit the posts and deck joists. This will help to spread the weight of your deck over a larger area, and reduce stress on the beams and posts.
It’s also a good idea to minimize wood-on-wood contact as you build the deck frame. Leaving small gaps between the end of the beam and the joist can help rainwater escape, rather than being trapped against the wood grain and becoming rotted. Also, consider using hemlock or fir (either Eastern cedar or western red cedar will also work) as they are naturally rot-resistant.